
New Routing in Next.js - App Router


App Router is a new paradigm for building applications that was released in the 13th version of Next.js.
After it became stable in version 13.4, we began actively considering its use. Initially, it needed to be apparent how to build routing with this new paradigm. But, after some digging into the information, we decided to inject the App Router into our project. Today, we want to give you an overview of the main differences between the App Router and the traditional Page Router.
So, let`s get started.
App Router features
The main advantages of App Router are optimizing the initial page load time and minimizing the size of JS bundles by using React Server Components (or RSC).
What are Server Components?
Server Components are React components with no dynamic functions and which are not initialized on the client. They do not contain user interactivity, so we can not use React hooks, event handlers, and browser APIs (local storage, etc.) inside such components. Server components render on the server and then return a special React Server Component Payload (RSC Payload) to the client that contains HTML, props, and placeholders where client components are inserted. Once the client receives them, ReactDOM merges elements into the DOM.
Server components render once on the server and do not re-render on the client. That's why we can't operate the state or use any effects in these components because every state's update causes the component's re-render. Since server components initialize on the server, they are not included in JS bundles and are not visible in the React Developer Tools extension.
Server components allow the data to be fetched on the server without making requests from the browser. It reduces the number of network calls and thus helps improve performance. With RSC, the initial page load will be faster, and users can interact with the page without waiting for it to be fully loaded.
In addition to server components, there are client components. Client components are traditional React components. They allow you to use different effects and event listeners and have access to the Browser API. To interact with the server, client components follow the standard way: send a request and wait for the response. Once the response is received, they move to the following action.
Client Components are dynamic components for building interactive UI.
Server Components in Next.js
Traditional Page Routing in Next.js already has its custom implementation of rendering components on the server. All magic is in the getServerSideProps function. This function runs only on the server, not the client (browser).
const News = ({ news }) => ( <> {news?.map((new) => ( <div key={new.id} > <h4>{new.title}</h3> </div> ))} </>);
export const getServerSideProps = async () => { const response = await fetch('url'); const news = await response.json();
// Return the data as props return { props: { news }, };};The async getServerSideProps method retrieves data from the server at each page request and returns the props object. The received data is transmitted to the React component as props. The component gets the data and starts applying Javascript (hydration process). The getServerSideProps function calls on the server, so we do not see a network request.
The Page Router Next.js implementation is pretty good, but there is a downside - the getServerSideProps can be used only on the top page level. So, if some nested component should have data from the server, we need to pass props from the main page. Also, as we mentioned above about the hydration process, the page components are rendered on the client and the server.
With the App Router, we no longer needed the getServerSideProps function. Since the App Router uses React Server Components, we can call the native fetch API to load the data directly into the component. It allows you to avoid being tied to the top level of components and call the server data in nested components.
const getNews = async () => { const response = await fetch("url"); return response.json();}
const News = async () => { const news = await getNews();
return ( <> {news?.map((new) => ( <div key={new.id} > <h4>{new.title}</h3> </div> ))} </> );};In the code above, the NewsList server component is asynchronous. Once the promise is resolved, the generated element will be passed to the client.
Next.js caches the returned values by default. It also has the caching functionality for multiple identical requests. So, if you send several requests with the same data but from different server components, Next.js will cache them.
If components need to be revalidated occasionally, you can specify the revalidate directive to the fetch method.
fetch('https://...', { next: { revalidate: 60 } });Note: All components in Next.js are server components by default. To use Client Components, we must add the “use client” directive at the top of the file. Please see the official documentation for more details.
How to combine server and client components in the App Router?
Server components can render client components.
Suppose you need to display the data necessary for SEO in the carousel (it was the real task for us recently). The carousel is an interactive element, and you can`t use it inside server components. The way you can solve the task is to create a server component that retrieves the data from the API and returns the client component with the data as props.
// Server componentconst getData = async () => { const response = await fetch("url"); return response.json();}
const ServerComponent = async () => { const data = await getData();
return ( <ClientCarouselComponent data={data} /> );};
// Client component (react-slick)'use client';
const ClientCarouselComponent = ({ data}) => ( <Slider settings={...settings}> {data?.map((item) => <div key={item.id}>{item?.name}</div>)} </Slider>);Client components can`t render server components.
'use client';
// Unsupported!const ClientComponent = ({ data}) => ( <ServerComponent />);But if you need to, you can pass a server component as a children prop into the client component.
'use client';
const ClientComponent = ({ children}) => ( <>{children}</>);
const ParentComponent = () => ( <ClientComponent > <ServerComponent /> </ClientComponent >);App Router routes structure
Several significant changes have been made to the implementation of the App Router routes structure.
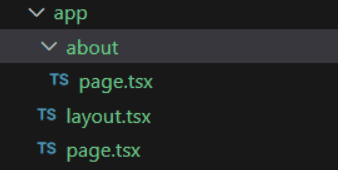
- The pages directory was renamed to the app directory;
- To create a new page, we need to specify a folder with the route name and put the
page.jsx(.tsx)file inside. The homepageshould be at the root of the app directory;
- Added the ability to handle the server's instant loading and error states by adding
loading.jsx(.tsx)anderror.jsx(.tsx)files in a route folder; - Added the Route Groups feature that allows you to organize routes without changing the URL path. If you want to add a folder to structure your routes and do not change the URL, you need to wrap the folder name into parentheses: (folder name). The output route will be /profile/notifications without the dashboard;

- Added the Parallel Routes feature that allows you to render multiple pages on the same layout. To define a parallel route, you need to specify the @ symbol at the beginning of the folder name:
@users; - The 404 page was renamed to not-found. But, at the moment, it is not just to change the file name. To automatically handle visits to a URL that is not in the routes, we need to do a trick:
- create a [...rest] folder in the app directory:
app/[...rest]and put the page file that calls thenotFound()function;
- create a [...rest] folder in the app directory:
// app/[...rest]/page.jsx(.tsx)
import { notFound } from 'next/navigation';
const CatchAllPage = () => notFound();
export default CatchAllPage;- Create a not-found file at the root of the app directory and put a custom 404 layout inside:
// app/not-found.jsx(.tsx)
const NotFoundPage = () => ( <p>Not found custom page</p>);
export default NotFoundPage;Many changes have been made to the new implementation of the App Router, and these are only some features. We recommend you read the official Next.js documentation to learn more about them.
App Router Metadata
The App Router provides a new Metadata API with all necessary SEO settings. There are two possible ways to add metadata in the App Router.
For static pages, you can define a metadata const on a page.
export const metadata: Metadata = { title: 'Site title', description: 'Site description', openGraph: { title: '', },};There is also the ability to specify the shared meta tags in the Layout component and override them for the concrete page if needed.
For dynamic metadata, you can use the generateMetadata function.
const getPost = async (slug) => { const response = await fetch(`url/${slug}`); return response.json();}
export async function generateMetadata({ params }) { const post = await getPost(params.slug); return { title: post?.title, description: post?.description };}
const ServerComponent = async ({ params }) => { const data = await getPost(params.slug);
return <div>...</div>;};The getPost will be called only once because Next.js has the functionality to cache multiple similar requests.
Metadata default values
The App Router Metadata API provides two default meta tags that are automatically applied to any routes: charset and viewport.
<meta charset="utf-8" /><meta name="viewport" content="width=device-width, initial-scale=1" />There is also the ability to generate custom viewport options in the Layout or Page files.
export const viewport: Viewport = { width: 'device-width', initialScale: 1, themeColor: 'black',}For the dynamic routes, you can use the generateViewport function instead of the static const.
export function generateViewport({ params }) { return { width: 'device-width', initialScale: 1, themeColor: 'black', }}Metadata images and files
To add metadata images and files to the application, such as favicon.ico, twitter card, or sitemap.xml, we can put the static files into the app directory or generate them programmatically.
Here is the list of available metadata files in Next.js:
- favicon.ico
- apple-icon.(jpg|jpeg|png)
- icon.(ico|jpg|jpeg|png|svg)
- opengraph-image.(jpg|jpeg|png|gif)
- twitter-image.(jpg|jpeg|png|gif)
- sitemap.xml
- robots.txt
All images, except the favicon, can be added to any route. The favicon, robots.txt, and sitemap.xml files should be placed at the root of the app directory.
Let`s consider an example. Suppose we want to add the Twitter image to the application. We can put a static twitter-image file to a route or add a twitter-image.jsx(.tsx) file to generate this image programmatically.
// twitter-image.jsx(.tsx)
import { ImageResponse } from 'next/og';
export const size = { width: 32, height: 32,};export const contentType = 'image/png';export const runtime = 'edge';
export default function icon() { return new ImageResponse( ( <div style={{ fontSize: 24, background: 'white', width: '100%', height: '100%', display: 'flex', alignItems: 'center', justifyContent: 'center', color: 'white', borderRadius: 5, }} > Twitter </div> ), size, );}The output will be the following:

If you want to know more about the App Router metadata API, please read the documentation.
Conclusion
App Router is a new Next.js paradigm that can significantly optimize your application's initial page load time and minimize the size of JS bundles by using React Server Components. Also, new routing features, such as shared layout, route group, and parallel routing, can give you more flexibility in creating and structuring your routes.
In contrast to the Page Router, the usage of the App Router may need to be clarified at the beginning. But it's just a matter of time. However, the App Router is still a new Next.js paradigm, and it should be understood that you can face difficulties when using it.
We hope this article was helpful to you! Thanks for reading!
