
How to Use External Images from Dropbox in Gatsby Blog?


The availability of large amounts of media files in the git repository, can lead to an increase in the time you need to spend to use commands such as clone, pull and push. It also means a sacrifice of performance because media files are usually heavy, and more energy is spent on processing them.
In this article, we will show you how to optimize the storage of media files by using the Dropbox file-hosting service.
Dropbox is a central and organized place to store all of your files. There are some useful features such as folder suggestions, Dropbox spaces, and a user-friendly interface that will help you work with files remarkably easily!
Steps to use external images from Dropbox in Gatsby
1. Create a new Dropbox account
First, you need to create a new Dropbox account.
- Go to Dropbox.com and click on "Sign up"
- Enter all required information or sign up with your Google account
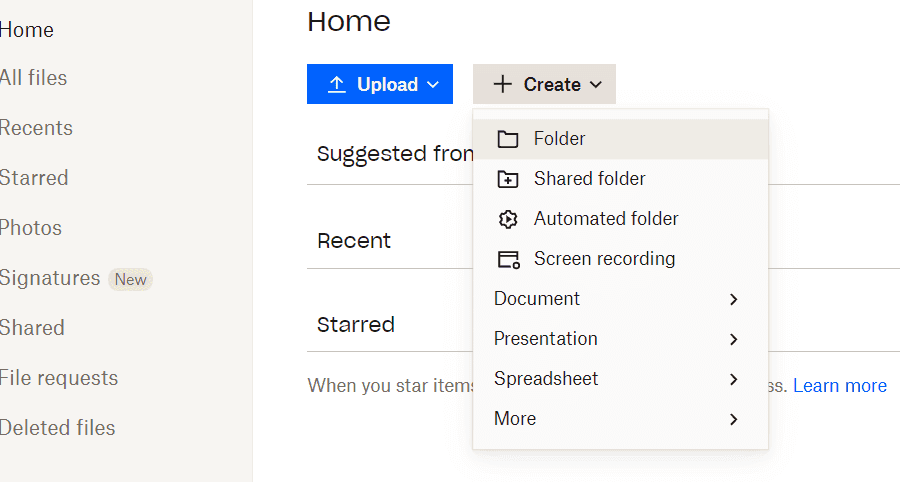
- After creating an account, you will be taken to the Dashboard page
- Click the "Create" button to add a new files folder
- Go to your new folder and click the "Upload" button to upload files
- Use different Dropbox features to organize your files for your needs
That`s it! You can also install the Dropbox Desktop App on your PC.
2. Add an image URL to your markdown files
Next, you need to add an image URL to markdown files.
- Open an image and click the "Share" button at the upper right corner

- Copy the image link
- Past the copied link to your markdown file. To make the link visible to the users change the parameter "?dl=0" to "?raw=1".
---title: 'My first blog post'imageUrl: 'https://www.dropbox.com/s/7s8xkjml067myte/{image}?raw=1'---If you get the "unsupported image format" error during the build, click the image right mouse button and copy the image URL. This should fix the build issue.
3. Modify the gatsby-node.js
Finally, to keep the remotely hosted images as File nodes in the GraphQL layer, use the createRemoteFileNode method from the gatsby-source-filesystem plugin.
const { createRemoteFileNode } = require(`gatsby-source-filesystem`);
exports.onCreateNode = async ({ actions, createNodeId, getNode, node, getCache,}) => { const { createNodeField } = actions;
if (node.internal.type === `Mdx`) { const fileNode = await createRemoteFileNode({ url: node.frontmatter.imageUrl, parentNodeId: node.id, createNode, createNodeId, getCache, });
if (fileNode) { createNodeField({ node, name: 'file', value: fileNode.id }); }
… other logic }};If you want to make the image field optional and not apply it to all posts, you can define a custom GraphQl type of scheme.
exports.createSchemaCustomization = ({ actions }) => { const { createTypes } = actions;
createTypes(` type Mdx implements Node { frontmatter: Frontmatter image: File @link(from: "fields.file") }
type Frontmatter { title: String! imageUrl: String } `);};
exports.onCreateNode = async ({ actions, createNodeId, getNode, node, getCache,}) => { const { createNodeField, createNode } = actions;
if (node.internal.type === `Mdx`) { if (node.frontmatter.imageUrl) { const fileNode = await createRemoteFileNode({ url: node.frontmatter.imageUrl, parentNodeId: node.id, createNode, createNodeId, getCache, });
if (fileNode) { createNodeField({ node, name: 'file', value: fileNode.id }); } }
… other logic }};Let's break these lines of code down:
- Define the custom scheme using the Gatsby Schema Customization API:
- Make the
titlea required field in theFrontmattertype, and theimageUrlis optional.Frontmatteris the top part of the markdown file, which consists of key-value pairs. - Add a new Image field to the
mdxtype and make it aFiletype. Use thefromargument to specify the link extension to the correct field name.
- Make the
- Call the
onCreateNodefunction from the Gatsby Node API to create a new node. - Create a new Node by calling the
createRemoteFileNodemethod with some parameters:url- the image URLparentNodeId- id of the parent nodecreateNode- helper function to generate the nodecreateNodeId- helper function to generate the node IDgetCache- helper function to get cache instance by name (optional)
- If the Node is created, call the
createNodeFieldmethod to generate a new file field. Pass the Node ID as a value of this field.
Now, the new Image node is added to the root of any markdown node with the imageUrl field instead of the Frontmatter.
To get the Image node from GraphQL, use the following query:
graphql` query { allMdx(limit: 1000, sort: { frontmatter: { date: DESC } }) { nodes { fields { slug } frontmatter { title } image { childImageSharp { gatsbyImageData(width: 800) } } } } }`;Then, include a new Image node to a blog post component.
const PostComponent = ({ post }) => { const articleImage = getImage(post.image);
return ( <article> <h2> <Link to={post.fields.slug}>{post.frontmatter.title}</Link> </h2> {post.image && <GatsbyImage image={articleImage} />} </article> );};Restart the application using the gatsby develop command, and the remotely hosted images will be available locally.
Conclusion
Utilizing external images from Dropbox in your Gatsby blog can significantly enhance performance and streamline media file storage. By following the steps outlined in this article, you can optimize your image management process, reduce repository size, and improve overall efficiency.
We hope this article was helpful to you! Thanks for reading!
